More usual than not, when I am asked for a portrait, it is for corporate use and, again, more often than not – the end use is for web or simple marketing collateral. These are typical straightforward head and shoulder shots with simple backgrounds that will render well in BW and look good in smaller sizes. So this is where my head is usually at when I am asked about taking “business” shots.
A while ago, Julie, a friend who has launched her own brand consultancy business casually asked about doing a shoot sometime – to which I said sure. Months later, I bumped into her and she mentioned a course she was teaching in Croatia and a need for some marketing and magazine article photos, but remarked that she was just going to send what she had. I have seen the photos of her and I think she has some great shots so thought nothing more of it.
A few days go by and I get a flurry of emails and other messages from her. Turns out, none of her shots are acceptable, and she needs a photos within the week. It’s a friend, so even though it was Wednesday, and I already had plans for the weekend to go away, I said I would do my best. So, how to get this done…
We agreed to meet that same evening to run over some ideas. I wanted to show her some images to help get her comfortable with me (though she has seen my work) and I wanted to get a better sense as to what was needed.
As I have learned before, find out exactly what the client needs – anything left to interpretation will be misinterpreted!!! After our first meeting, she contacted the folks needing the shots and asked what specifically they wanted. Ideally, the order would be the other way around, but with the difference in time zones and only four evenings to get the shoot done there was no choice. The good news was that they liked the direction that we were taking.
They sent some samples for reference. What were these sample images? Marissa Mayer, the CEO of Yahoo! At first, I was a bit dumbfounded as I thought that Mayer was also talking at the event and this was what I had to match up too. I quickly realized that what they did was to search for images of Mayer since the parallel to my client is that both are strong, successful women. I felt a little better about that, but still had my work cut out for me.
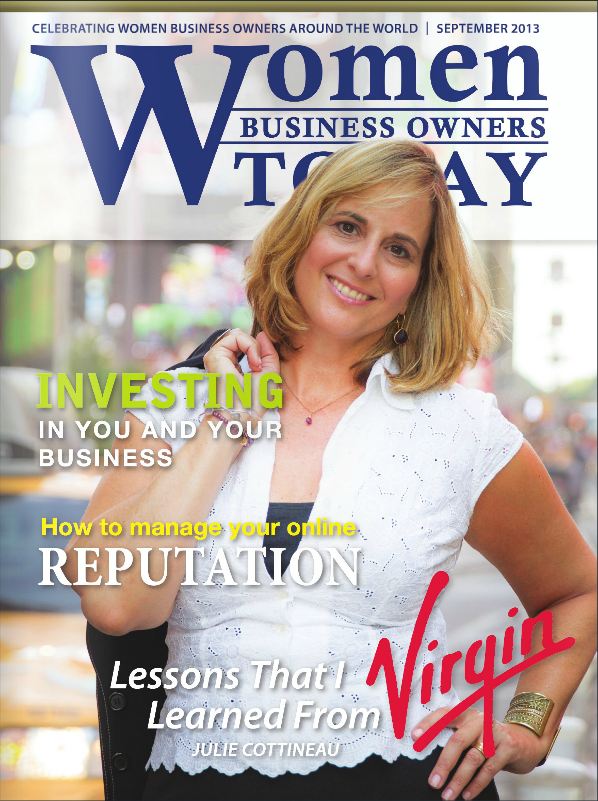
My plan was simple. Get some clean head and shoulder shots just to have something no matter what, then move on. I created a ‘desk’ like set and added branding books with direct ties to Julie. Everyone liked the ‘school’ feel of the books (Her conference is called Brand School.) We staged a few variations of this and also did some shots with her using an easel and pad as she would be doing when teaching.
After we got confirmation on this direction from the magazine publisher, I invited her over for a second set of tests so we could work a bit more on the staging and set up. Given the complete lack of time available (uh-hum, like a day job!) – I put together a setup in a home studio with a simple seamless white backdrop. As much as it would have been great to find an office or other location, given a total of four nights to plan and execute the shots (and to process), I went this route so I could control everything.
I brought in some furniture and props that made sense for the shots and on the second night, we ran through several sets that we agreed worked for the event – which was a master class in branding. I had to not think about the Forbes cover shots of Mayer with fancy office backdrops and wonderful lighting – and instead focused on making the best with what we had. I said that she had to get a stylist for this shot – there was no way I could handle being a photographer, art director AND a stylist!
The plan was to do the shoot on Monday. She arranged to meet with the MUA at 6pm and I asked Rich, a photographer friend if he could assist me too. I went away for the weekend and when I got back home Sunday night, I made sure the set was clear and batteries were charged.
A huge upside to a dedicated studio space for shoots like this is that you can work out lighting positions, modifiers, ratios and more – and be able to leave things as they are. No stand in available for setting up shots? No worries – an extra light stand with a hat on it can work. I setup a boomed Apollo softbox for my key and a smaller softbox for fill and a simple 1/8″ gridded speedlight for a rim/hairlight. I had initially tried lighting the backdrop for a high-key look – but decided against it after seeing some of the tests. (You may notice some stray light stands in some of the shots – these had umbrellas on, but were just left around when no longer needed – and not cleaned up yet – so not doing anything in the shots.)
Monday came and I ran home to meet the team at 6pm. I barely had time to change clothes and get some fans going when the bathroom was taken over for makeup. I ran through the lighting setup with Rich and explained what I would likely be asking him to do. Even though the list of shots was short, I made sure that I wrote them down so that we would not miss anything. Before we got started, I got some tunes going. (Always a good idea to have client’s music preferences playing – anything to make them comfortable.) The shot at the top was one of the earlier images from Monday. Clean, simple lighting to show Julie in her trademark purple colors. Just enough lighting to get confidence that the shot would work and move on!
The MUA helped with modelling positions and ended up sticking around for the whole shoot. Here was another example where having a tethered laptop was not optional. (During the tests, I let Julie see all of the shots – but told her that for the shoot, she would not have that same access.) I had the laptop set so I could shoot and just look down to see the result. The stylist was also able to look at the screen which was really helpful. I would shoot – look at the result – point at some out of place hair or odd crease in a dress and she made the appropriate fixes. Click, fix, click, fix, click check done. The client is only brought over to look at the shot when you are done with that image. This gives them confidence the shoot is going well – and it does not pull them out of their pose for each click of the shutter button!
A hard part of a project like this is making the decision that a shot is good and move to the next one. This could mean that the shot will never work or that what is there is good enough. Since there were a lot of different shots to be done AND Julie wanted to try different dresses for them, I had to be efficient with time if there was any hope of getting through the night.
For portraits, I typically try to have as much set beforehand so the shoots are quick and the subject does not get numb being in front of the camera. This was simply not an option on this project. The good news was that the Julie was very patient and understood this was going to be a long evening – and was able to get back into a ‘good place’ for each round of shots.
Another thing that has to be anticipated and planned for a shoot like this is that the lights will need to be re-adjusted quickly after each set change. I shot with speedlights and Yongnuo 622c radio triggers that allowed me to make changes to my Canon (and knockoff compatible) speedlights directly from the back of my camera. Given the needed lighting adjustments – this really made the process go easily. It is one thing when you are planning two or three images for a shoot – another when you may have a dozen or so!
The shoot went well – energy was kept up through the evening and the stylist was enthusiastically jumping in to get things just so. There was one additional shot that we had not blocked out beforehand – one with a laptop as the prop. While they were doing makeup, I did some quick tests for this using Rich, but when we did real test with the Julie – I basically said “no” – move one. There is no point is wasting time trying to reset lights and props when we already had a laundry list of shots we agreed should meet the project’s needs.
Along the way in the planning for this project, another shot request came in which was ‘could we do something that said “New York”‘. We agreed that a Times Square shot would have to do, and decided to do that on the day after the studio shot. There was simply no time to scout the location so I hoped we could find things on the fly. I had a simple idea for a tight headshot with nice bokeh’ed billboards in the background. Nothing original here, but I thought this would play well for the international magazine it is being shot for.
We met up a little after 6pm and I was not sure what lighting I would be able to use. I bought a few strobes as well as a small umbrella with the thought that I might have a VAL hand-hold it. I also brought a leaf shutter camera (Fuji X100s) with the thought that I could shoot at higher shutter speeds earlier on if I wanted to overpower the light.
Well, the crowds were ridiculous when I got there (warm July evening – should this be a surprise!?) and I decided to go with an on-camera flash with a diffuser that I would use as a fill flash. I set it to -1 to -2 EV with TTL and did some quick tests to get comfortable that this would work. My goal was to get that one shot. Anything more would be gravy.
Julie, who now had three sessions with me within a week – including almost three hours the previous night needed little instruction on hand, body and head positioning. Without a stylist and a constant swirling wind, keeping neat hair was a little bit of a challenge, but we agreed that this was an outdoor shot – so a little out of place hair would be natural.
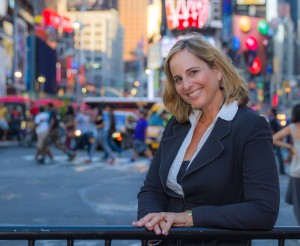 |
| Julie in Time Square |
As mentioned before, I had decided to shoot wide open – f2.8 on my 24-70mm lens. Julie wanted taxis, so I was timing shots to wait for no people in the background as well as taxis being there. I would tell her – wait – and just stand there for a minute or so, then we would take a flurry of shots as the environment allowed.
 |
| Shooting Wide Open in Times Square |
We roamed around looking for shots. It was pretty amusing – at times, she would be standing in the street so I could get something interesting (or not) behind her. At one point, some guy ran behind me to take a picture of her – I guess they thought she must be famous!
In retrospect, if I had a skilled assistant, I would have benefitted from using an off camera flash, even without an umbrella. The reality was that it was too noisy and crowded for me to be directing both the subject and a VAL – just too much to do. I just kept chimping to make sure that my fill was changing appropriately with the ambient light. Some of the shots needed more post than others – but the final images were what I intended.
A funny aspect to this part of the shoot was the planning for the light. I checked sunset and planned to be there with ample time to work into that time. Makes sense, right? We got enough images and decided to call it a night and grab dinner right in Times Square. When I walked outside after dinner – the light in the area has not changed!?!? Hmm, maybe ten bazillion watts of lights from all those signs could be doing that? Got to remember to scout the location next time – no excuses.
The deadline for the magazine submission was 10pm on Wednesday and I was able to process and deliver images to Julie with time to run through them and make a few tweaks – with almost 15 minutes to spare!
This was a great experience – one of those times when saying yes meant (as usual)
more work than expected. But Julie was a great subject that knew what she wanted, knew what she didn’t like – and was willing to do what it took to get the shots without any negativity. I was impressed with her ability to throw out a great smile throughout the marathon studio session and I think the images reflect her winning attitude.
So far, the pictures have been put to good use, including a ‘cover’ of an eZine!